Security Analysis in an OpenID Connect Lab Environment
Security Analysis in an OpenID Connect Lab Environment
In this post, Christian Fries shows an approach to unveil security flaws in OpenID Connect Certified implementations with well-known attack methods. One goal of the master’s thesis Security Analysis of Real-Life OpenID Connect Implementations was to provide a platform for developers and security researchers to test implementations in a reproducible and maintainable OIDC lab environment.
We selected six OpenID Provider (OP) and eight Relying Party (RP) services and which are included in the lab environment. For a comprehensive security analysis, we tested the implementations against eleven Relying Party attacks and seven OpenID Provider attacks in different variations with our tool PrOfESSOS [1]. In addition, manual tests were carried out as well. We have disclosed twelve implementation flaws and reported them to the developers in a responsible disclosure process.
Two developer teams fixed (✔) the vulnerabilities during the deadline for the master’s thesis. One Redirect URI Manipulation (✖) was rejected. For reasons of interoperability and fault tolerance, this special case can be permissible for only one registered URI. Three other teams were informed (✦).
We explain the method of how we have archived this result in the following sections.
Introduction
The OpenID Connect protocol framework defines three basic flows, Authorization Code Flow (or just Code Flow), Implicit Flow, and Hybrid Flow. Besides the main flows, there are several extensions that are also introduced by the OAuth 2.0 layer. One of the latest extensions is Code Flow with PKCE (Proof Key for Code Exchange).
Compliance with the specification requirements is essential for the application security. Settings and parameter conditions are changed. For example, in Code Flow, a nonce parameter in the Authentication Request is optional, but required for the Implicit Flow. The developers have to deal with such changes. They end up with implementing several code branches and various state machines. The more features and extensions are supported by the implementations, the higher is the code complexity. This complexity implies that minor changes with only one specific flow in mind, can introduce a security issue in another flow.
Various well-known attacks are published in different papers and several mitigations mentioned in best practise guides [2]. One tool, which can perform fully automated evaluation of services with generic attack vectors, is PrOfESSOS.
PrOfESSOS
PrOfESSOS is our Evaluation as a Service (EaaS) security tool [1]. It has been further improved over the past few years. In the latest version, it can simulate a malicious RP which can carry out the attacks against an OP. In addition, an honest and a malicious OP can be simulated to perform Single-Phase and Cross-Phase attacks. A penetration tester can access the RESTful API directly or via the provided Web UI to start an evaluation.
Supported attacks on Relying Parties
Supported attacks on OpenID Provider
The Lab Environment
Overview
A developer or security researcher needs a running web application to start an evaluation. One way to create an analysis is to execute the web application and evaluation tools on a local development machine. This might be a practical compromise for small-scale projects. For n-instances of an application with different configurations and a concurrent team collaboration is desired, this approach can be cumbersome. Through its popularity, docker containers can help here. Various RP and OP already offer a container setup, or at least there are examples of how to create Dockerfiles. It is possible to have reproducible build results through the container concept. In addition, this approach enables us to store static configuration files and SQL dumps for a specific instance.
We introduced three networks running on a server for our lab environment setup. The ProfNET for all evaluation tools which can be controlled and debugged from a remote client. Furthermore, we added a RPNet for all Relying Parties and an OPNet for all OpenID Provider. The MitMProxy connects the networks and the users’ browser. It provides us the opportunity to observe and manipulate every http(s) communication in front and back channel.

Setup
Server Side
It is only required to checkout the oidc-docker-libs [3]. The docker-compose setup can be built and run with:
git clone https://github.com/RUB-NDS/oidc-docker-libs
docker-compose build
docker-compose up -d
The docker-compose provides the possibility to run only a small subset, for example:
docker-compose up -d professos mitmproxy mitreid-server
Docker Structure
The basic idea of our docker containers is to build from sources in a more or less generic way. We intended that each application run as a completely independent unit. The application configuration can be performed with build arguments, environment variables, or complete SQL dumps.
You can see that we structured a Dockerfile in four blocks:
FROM ubuntu:18.04

ARG BRANCH=v3
ARG FLOW=implicit
ARG CONTROLLER_URL
ARG SERVER_HOST

# Setup the application
ENV APPDIR /opt/app
WORKDIR ${APPDIR}
RUN git clone --depth=1 --branch=$BRANCH https://github.com/YOU/YOUR_APP
RUN cd YOUR_APP \
    && echo config=$FLOW >> configuration_file \
    && ./build

# deploy automatically created certs
ARG CA_DIR="/certs"
ARG CA_CERT="oidc-ca.crt"
VOLUME ["$CA_DIR"]

# Configure apache or nginx
COPY config/apache-ssl.conf /etc/apache2/sites-available/ssl.conf
RUN sed -i "s#SERVER_HOST#$SERVER_HOST#g" /etc/apache2/sites-available/ssl.conf
RUN a2enmod headers ssl proxy proxy_http rewrite && a2ensite ssl
RUN echo "https://$CONTROLLER_URL" > /var/www/html/.professos

# Start the application and apache/nginx server
COPY docker-entrypoint.sh ${SUBDIR}/
WORKDIR ${SUBDIR}
ENTRYPOINT ["./docker-entrypoint.sh"]
From this point, it is possible to add two or more configured instances to the docker-compose.yml file. Every instance can be tested independent and without influencing each other. This enables us to test various switches, e.g. different flows or authentication methods in different combinations.
app1-implicit:
    build:
      context: rp/app1
      args:
        FLOW: "implicit"
        CONTROLLER_URL: ${CONTROLLER_HOST}
        CLIENT_HOST: ${APP1-IMPLICIT}
    depends_on:
      - certs
    volumes:
      - certs:/certs:ro
    env_file:
      - .proxy_env
    environment:
      CA_DIR: ${CA_DIR}
      CA_CERT: ${CA_CERT}
      VIRTUAL_HOST: ${APP1-IMPLICIT}
    networks:
      - rpnet
      - profnet
app1-code:
  build:
    context: rp/app1
    args:
      FLOW: "code"
      CONTROLLER_URL: ${CONTROLLER_HOST}
      CLIENT_HOST: ${APP1-CODE}
  depends_on:
    - certs
  volumes:
    - certs:/certs:ro
  env_file:
    - .proxy_env
  environment:
    CA_DIR: ${CA_DIR}
    CA_CERT: ${CA_CERT}
    VIRTUAL_HOST: ${APP1-CODE}
  networks:
    - rpnet
    - profnet
Client Side
The user solely has to establish a proxy connection to SERVERIP:8080. For example, in Firefox the addon FoxyProxy [4] can switch easily between different proxy settings.
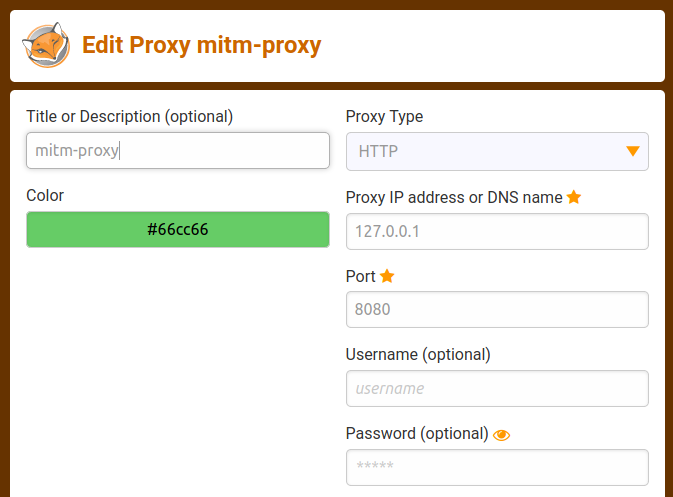
It is advisable to install the generated Root-CA (oidc-ca.crt) in the browsers’ certification store. Otherwise, self-signed certification warnings will be displayed. After the web browser is connected to the proxy, it should be possible to reach the landing page https://lab.
Automatic Tests with PrOfESSOS
We have two options for automatic tests with PrOfESSOS. One option is the Web UI at https://professos. The other option is to call the RESTful API methods directly. Both options require a configuration file with target information. PrOfESSOS requires this information to find all needed URLs and parameter fields to login with selenium scripts.
You can use the following JSON file for the MITREid Connect Client:
{
  "UrlClientTarget": "https://mitreid-client/simple-web-app/login",
  "InputFieldName": "identifier",
  "SeleniumScript": "",
  "FinalValidUrl": "https://mitreid-client/simple-web-app/",
  "HonestUserNeedle": "{sub=honest-op-test-subject, iss=https://honest-idp.professos/CHANGE_ME}",
  "EvilUserNeedle": "{sub=evil-op-test-subject, iss=https://attack-idp.professos/CHANGE_ME}",
  "ProfileUrl": "https://mitreid-client/simple-web-app/user"
}
Only the CHANGE_ME parameter must be replaced manually with the displayed Test ID, as you can see in the next screenshot. The Test ID represents a unique OP address. This allows parallel testing as long as the implementation supports Dynamic Registration.
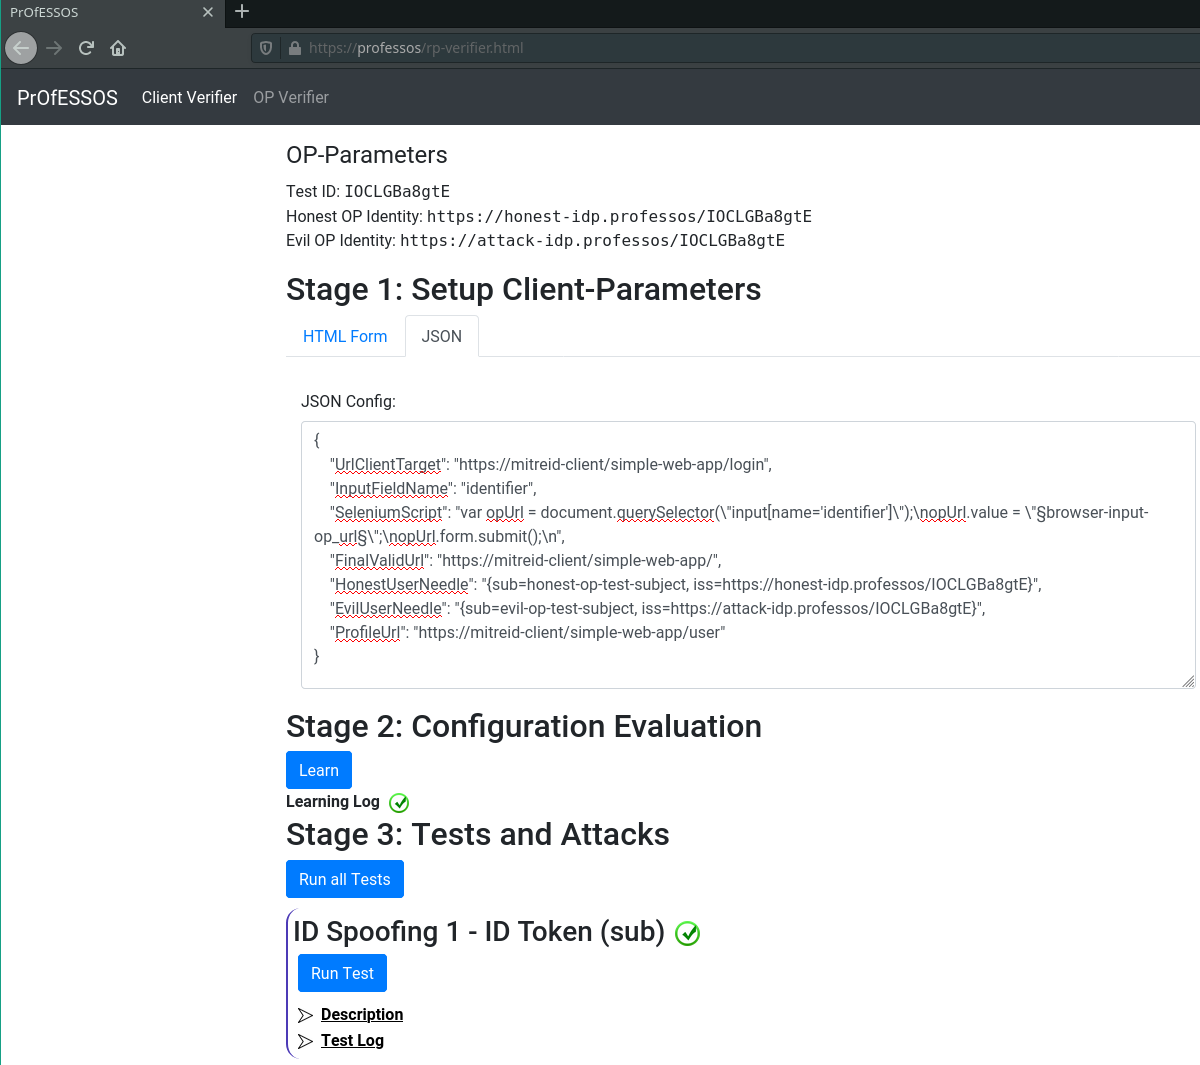
After clicking the “Learn” button, PrOfESSOS tries to log in with the honest and evil OP. If everything has worked as expected, a green check mark is displayed. Otherwise, the UI provides minor logs and a few screenshots until the error has occurred. The MitMProxy Web UI can be a helpful additional tool to debug such issues.
On success, explicit tests or all tests can be executed. Each test step provides a small description, and a test execution log.
The other option to start these tests is to use the RESTful API, as we already mentioned. Therefore, we provide a python cli tool in the oidc-docker-libs/oidc-lab-scripts folder. For all currently implemented RP and OP solutions, we have stored there the json configurations. After you start the cli tool you solely need to select a target and run a complete test. An HTML report is also created which can be shared with collaborators.
#> ./cli.py
[*] Professos CLI started
Starting Control Center for Professos!
cli> load rp mitreid-client

Start session default
cli>> rp> mitreid-client> full_test
Create new test plan: TestId = 6RZmcJHNd6o
Learn: {
    "HonestWebfingerResourceId": "https://honest-idp.professos/6RZmcJHNd6o",
    "EvilWebfingerResourceId": "https://attack-idp.professos/6RZmcJHNd6o",
    "UrlClientTarget": "https://mitreid-client/simple-web-app/login",
    "InputFieldName": null,
    "SeleniumScript": "",
    "FinalValidUrl": "https://mitreid-client/simple-web-app",
    "HonestUserNeedle": "{sub=honest-op-test-subject, iss=https://honest-idp.professos/6RZmcJHNd6o}",
    "EvilUserNeedle": "{sub=evil-op-test-subject, iss=https://attack-idp.professos/6RZmcJHNd6o}",
    "ProfileUrl": "https://mitreid-client/simple-web-app/user",
    "Type": "de.rub.nds.oidc.test_model.TestRPConfigType"
}
================================================================================
Run Test Step [0]: ID Spoofing 1 - ID Token (sub) - PASS
================================================================================
Run Test Step [1]: ID Spoofing 2 - ID Token (sub+iss) - PASS
================================================================================
Semi-Automated and Manual Tests
The MitMProxy can intercept and manipulate front and backend communication for minor manual tests. For example, the MITREid Connect client can perform user authentication with Keycloak as the OpenID provider. To simulate a redirect URI attack, you can intercept the Authentication Request or Token Request and manipulate the values.
Another reproducible way is to combine a specific PrOfESSOS attack, and a prepared script which is uploaded to the MitM scripting interface. Therefore, we added a server application to the MitM scripting interface, which can be controlled with the lab script cli tool.
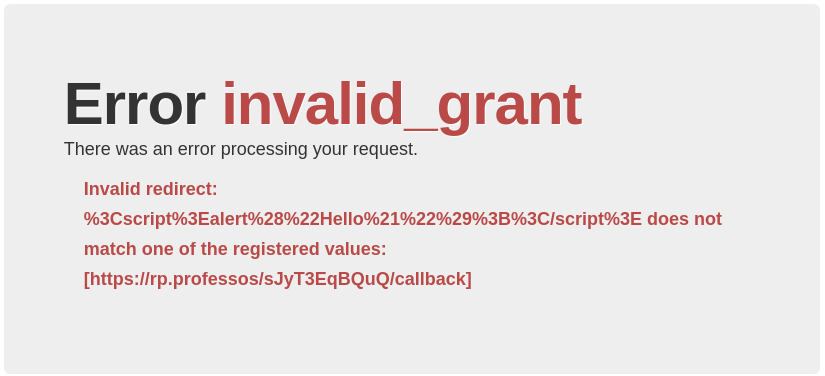
We used a such workflow to check if a special redirect URI is vulnerable to a XSS attack. You can try it on your own. The command to prepare this attack is:
./cli.py
[*] Professos CLI started
Starting Control Center for Professos!
cli> load op mitreid-server

Start session default
cli>> op> mitreid-server> create
Create new test plan: TestId = vWmdL4XHe2w
cli>> op> mitreid-server> learn
Learn: {
    "HonestRpResourceId": "https://rp.professos/vWmdL4XHe2w",
    "EvilRpResourceId": "https://evilrp.professos/vWmdL4XHe2w",
    "UrlOPTarget": "https://mitreid-server/oidc-server",
    "OPMetadata": "",
    "AccessToken1": "",
    "AccessToken2": "",
    "User1Name": "user1",
    "User2Name": "user2",
    "User1Pass": "user1pass",
    "User2Pass": "user2pass",
    "LoginScript": "",
    "ConsentScript": "",
    "Client1Config": "",
    "Client2Config": "",
    "Type": "de.rub.nds.oidc.test_model.TestOPConfigType"
}
cli>> op> mitreid-server> run_pyscript pentest/mitreid-server-redirect.py
Received: OK
Received: OK
cli>> op> mitreid-server> run 48
================================================================================
Run Test Step [48]: Custom 1 - Redirect URI - PASS
cli>> op> mitreid-server> export
cli>> op> mitreid-server> report
As a result, in the screenshot you can see that our javascript was escaped correctly.
Another new feature for RP tests is to expose a specific attack pattern with PrOfESSOS and go through the login process manually with a browser. This is archived with the cli and the expose command. If you want to test, execute these commands:
./cli.py
[*] Professos CLI started
Starting Control Center for Professos!
cli> load rp mitreid-client

Start session default
cli>> rp> mitreid-client> create
Create new test plan: TestId = hDOAisJy9OE
cli>> rp> mitreid-client> learn
Learn: {
    "HonestWebfingerResourceId": "https://honest-idp.professos/hDOAisJy9OE",
    "EvilWebfingerResourceId": "https://attack-idp.professos/hDOAisJy9OE",
    "UrlClientTarget": "https://mitreid-client/simple-web-app/login",
    "InputFieldName": null,
    "SeleniumScript": "",
    "FinalValidUrl": "https://mitreid-client/simple-web-app",
    "HonestUserNeedle": "{sub=honest-op-test-subject, iss=https://honest-idp.professos/hDOAisJy9OE}",
    "EvilUserNeedle": "{sub=evil-op-test-subject, iss=https://attack-idp.professos/hDOAisJy9OE}",
    "ProfileUrl": "https://mitreid-client/simple-web-app/user",
    "Type": "de.rub.nds.oidc.test_model.TestRPConfigType"
}
cli>> rp> mitreid-client> expose --test 3
- Start login at https://mitreid-client/simple-web-app/login
- For the OpenID Provider use the exposed attacker OP address https://attack-idp.professos/CHANGE_ME which can be copied from the learn step.
- The browser should display a simple message: Authentication Failed: Id Token Issuer is null -> Our attack was unsuccessful
- The honest OP address can be used to compare the result with a successful login attempt.
References
[4] https://addons.mozilla.org/de/firefox/addon/foxyproxy-standard/
https://www.nds.ruhr-uni-bochum.de/media/ei/arbeiten/2021/05/03/masterthesis.pdf
Acknowledgement
The master’s thesis was supervised by Vladislav Mladenov, Christian Mainka, and Jörg Schwenk. Thank you for the support and opportunity to write this thesis.